Jablotron JA-116H Wiring Module
- Jun 16, 2019

Jablotron 100 wiring module JA-116H
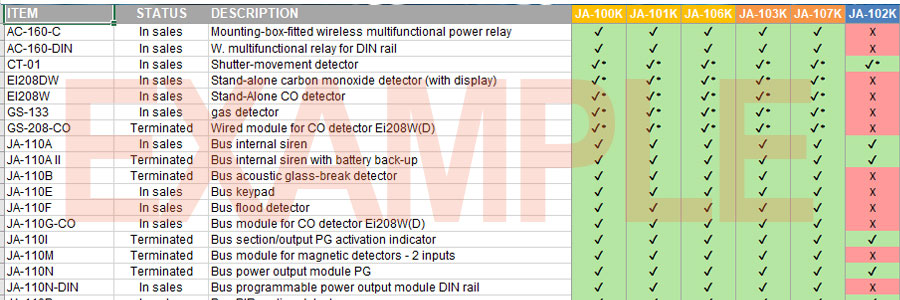
Combine the JA-100 control panel with wired existing Honeywell bus components. "A Honeywell Galaxy G2 system with 32 wired components was installed in our new home ...". In this article we show you how you can use the rich functionality of a Jablotron 100 central unit with your existing wired detectors from another brand.
Situation
A Honeywell Galaxy G2 system with 32 wired components was installed in our new home. These were connected to the control panel via 3 RIOs (independent units that communicate via the RS485 protocol). These RIOs were in different places in the house where the wired bus components were connected. 8 components wired per RIO.
Jablotron has 2 options available. Namely communicating via the RS485 protocol via a module or installing the JA-116H on the bus in the JA-106KR (distance max 200m). After some calls with Credex we soon came to the conclusion that the JA-116H bus expander was the right solution (cheaper and easier to install).
A total of 32 wired components were installed, of which 19 ended up in the alarm system and 13 in a separate cabinet connected to the RIOs. One JA-116H is built in the JA-106KR control panel (there is room for this) and the other JA-116H bus expander is installed remotely (16m) in one of the power supply cabinets of the RIOs. The JA-116H does not require a separate power supply since it is supplied via the central unit. This created space to install the JA-116H in the Honeywell metal power box (this had become superfluous).
Connecting
Module
Connecting the JA-116H is easy on the 2x 4-core bus connections that are present in the JA-106 control panel (color on color). At the JA-101 exchange there is 1 bus in the exchange. Make sure that everything is voltage-free before you start work.
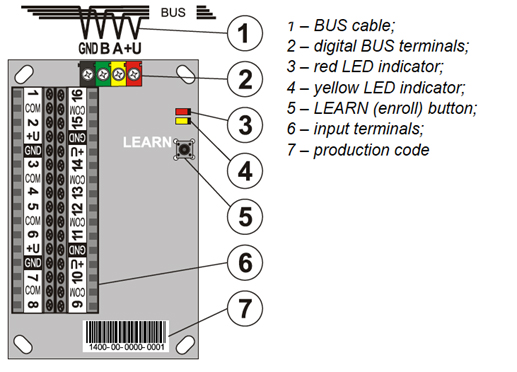
Figure 1: JA-116H module.
Wired sensors
First connect all wired sensors to the wiring module before starting the enrollment.
All wired components that can be connected: smoke detectors, PIRs and magnetic contacts from Honeywell, the existing installation in the new home. The figure below shows a few examples of how the various components should be connected: 8 = double balanced, 3 = balanced, 2 = NC and 1 = NO.
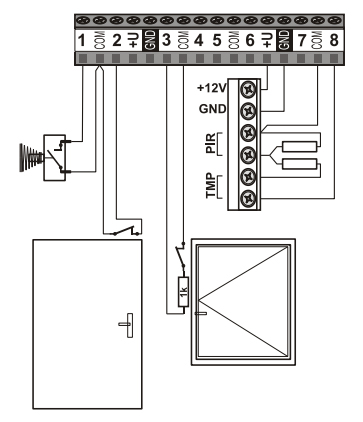
Figure 2: Examples of some connection diagrams.
Enroll
Enrolling in the JA-116H in the control panel is very easy. After the control panel is back on power, the 'scan / add new bus devices' button can be pressed, the control panel starts the process of creating the 16 positions (zones). Just make sure you have 16 free positions. When enrolling, the number is automatically numbered (see figure 3).
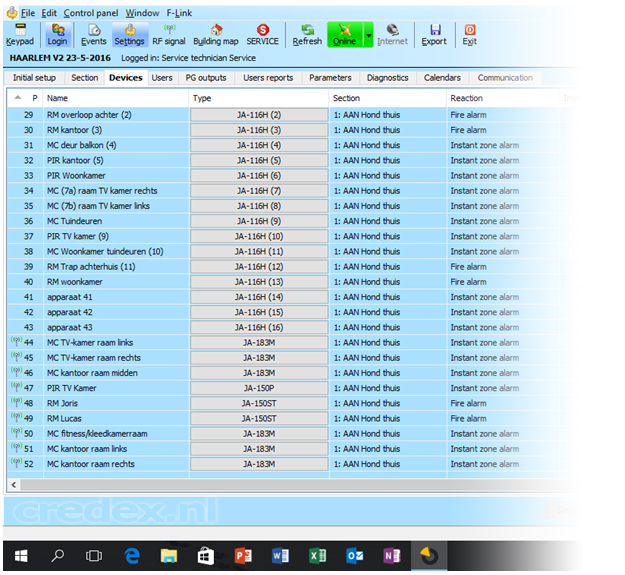
Figure 3: Printscreen in FLink: the JA-116H with 16 zones.
Internal Settings
After connecting all bus components to the wiring module, the configuration starts per zone.
You can enter the desired settings for each position via the "Internal Settings" button. PIR and Smoke Detector (RM) are double balanced and respond through pulse mode (tick). Delay time I have 0.5s to 1s (see print screen). Magnetic contacts (MC) are balanced and must be open for at least 0.5 seconds before they transmit triggering.
So determine for each component how it is switched (NC, NO, single-balanced and double-balanced), depending on the sensor and the number of resistors.
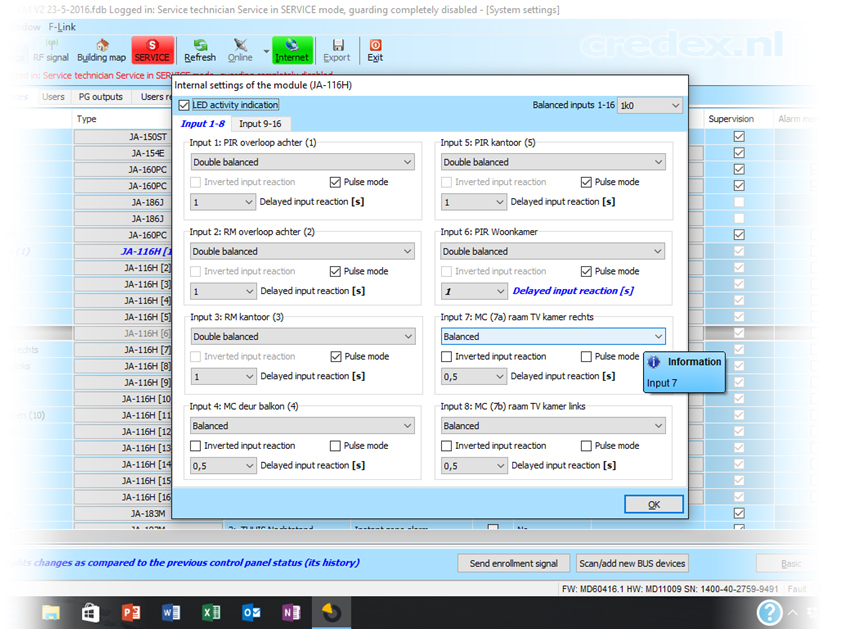
Figure 4: The internal settings of the JA-116H.
As can be seen on the print screen, the wired bus connections are further combined with wireless Jablotron detectors which I already had in our possession of our previous home. This means that 52 components are connected to the installation.
"The Jablotron 100 alarm system now works great with all components!"


Related Posts